

-Be(e) my Valentine-

Hallihallöchen Leute ,
Wie ihr ja sicher schon hier auf meinem Blog lesen konnten (
oder ihr höchstwahrscheinlich eh selber wisst ) ist bald Valentinstag!! Und wie
jedes Jahr stellt sich wohl der ein oder andere die Frage: "Was schenke
ich meinem Liebsten denn nur?“ Nun ich hätte da natürlich eine kleine aber
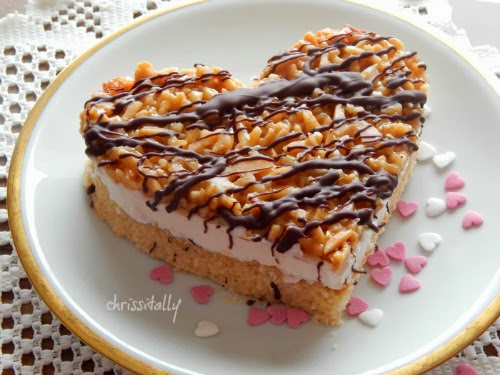
absolut köstliche Idee ^^. Und zwar Bienenstich-Herztörtchen. Sie sehen nicht
nur super süß aus sondern schmecken auch unglaublich lecker und sind mit viel
Liebe zubereitet ;)
Sie sind meiner Meinung nach sehr einfach zum machen, man
sollte nur ein klein wenig mehr Zeit ( ca. 90 Minuten) dafür einplanen, nur so
als Hinweis am Rande. Aber es wird sich wirklich lohnen denn die kleinen
Törtchen sind wirklich empfehlenswert ^^
Bevor ihr das Rezept lest, bitte schaut auf dieser Seite vorbei: (Klick)
Ich nehme mit dem Rezept an einem kleinen Wettbewerb teil
und jetzt ist es eure Aufgabe für mich zu Voten! Also bitte seit so lieb und
gebt mir einen Kommentar unter dem Rezept auf der Website zu der euch dieser Link führt, das würde mich wirklich sehr freuen ;)

Hello everybody ;)
Well like you have already read here on my Blog ( and well presumabely you know it anyway) Valentinesday is coming soon ! And if you are asking yourself what to give your Valentine , I have the almost perfect recipe for you ! Valentine Bee String Cake ! And the best thing: It´s really easy . Nevertheless you should arrange at least 90 minutes for baking, just mention ;) But it will honestly worth because those cute little cakes taste absolutely amazing and I just can absolutely recommend them !
Before starting the recipe please check out this Site : (Klick)
I took part in a little Competition and now it´s you turn to vote for me , so please be so kind as to comment on my recipe on the website this like will leads . That would make me the happiest person in the whole wide world ^^

Zutaten/Ingredients:

Zubereitung:


Zutaten/Ingredients:
-
Teig/Dough:
o
3
Eier/ eggs
o
150g
Mehl/ flour
o
100g
Rohrzucker/ brown sugar
o
125g
Butter / butter
o
½
TL Backpulver / 1/2 teaspoon of baking powder
-
Füllung/Filling:
o
300ml Schlagsahne / whipping cream
o
1 ½ Päckchen Sahnesteif / whipping cream stiffener
o
2 Päckchen Vanillezucker / 16g vanilla sugar
-
Topping:
o
175g Mandelstifte / coarsely chopped almonds
o
1 TL Mehl / 1 teaspoon of flour
o
75g Butter / butter
o
75g Rohrzucker / brown sugar
o
75g Schlagsahne / whipping cream
o
1 EL Honig/ 1 tablespoon honey
o
+ 50g Zartbitterschokolade / dark chocolate
Zubereitung:
1. Backofen
auf 180° C vorheizen. Eine Kuchenform fetten und mit Mehl ausstreuen.
2. Eier mit
Zucker schaumig schlagen. Danach Mehl einrieseln lassen und Butter
untermischen. Alles zu einem Glatten Teig verrühren in eine Springform
(Durchmesser 26 cm) und für ca. 15-20 Minuten backen.
3. Kuchen
aus der Form lösen und kleeblattartig 4 Herzen aus dem Biskuit schneiden. (Ihr könnt euch dazu eine
Herzvorlage aus dem Internet ausdrucken. Ich habe diese benutzt : Vorlage) Danach die Form auswaschen und mit
Backpapier auslegen.
4. Butter
für das Topping in einem Kochtopf schmelzen. Zucker, Sahne und Honig hinzu
geben und dabei kontinuierlich rühren bis sich alles gut vermischt hat. Kurz
auf niedriger Stufe köcheln lasen und währenddessen Mehl mit den Mandelstiften vermischen.
Diese dann unter die Buttermischung rühren und erneut ca. 1 Minute köcheln
lassen.
5. Masse in
die Tortenform füllen und im Ofen backen bis die Mandelschicht goldbraun wird
(das sollte ca. 15 Minuten dauern). Abkühlen lassen und währenddessen die
Herzform welche ihr bereits für den Boden verwendet habt auf ein Stück
Backpapier übertragen und ausschneiden.
6. Mit Hilfe
der Backpapierherzvorlage 4 Herzen aus der Mandelschicht schneiden.
7. Sahne
zusammen mit Sahnesteif und Vanillezucker schlagen. In eine Spritztülle geben
und auf dem Biskuitboden verteilen. Die
Abgekühlten Mandelherzen darauf platzieren und mit geschmolzener Schokolade
dekorieren.
Directions
1. Preheat your oven to 180°C
and prepare a 26cm baking pan.
2. First prepare the dough: Therefore beat the
sugar and the eggs until you have a fluffy mixture. Add flour and butter (should
have room temperature) . Now mix it all together until it´s well combined, fill
it into your baking pan and bake it for about 15 - 20 minutes. Let it cool down
and cut out 4 Hearts (you should use a template for this. I used this one: " Template" )
Afterwards
clean the pan and cover the bottom with some baking paper.
3. Now it`s
time for the Topping: melt the butter in a large saucepan and add sugar,
whipping cream as well as honey. Stir constantly doing this. Let it boil a few
moments. Meanwhile mix together the almonds and your flour . Fold the almonds
into your mixture and let it boil again for about 1 minute. Now fill the almond
caramel into your baking pan and bake for about 15 minutes until it becomes a
nice caramel color.
4.
Meanwhile cut out 4 more hearts with baking paper. Take your Topping out of the
oven and lay those templates on top. Let it cool down a few minutes and cut out
the hearts with a sharp knife. ( Be careful !)
5. While
your topping is cooling completely take a separate bowl and beat whipping cream,
whipping cream stiffener and the vanilla sugar until it´s stiff. Now spread the
cream on your biscuit hearts and place the topping on top of it.
6. Melt the
chocolate and decorate your cakes ;)
Wie niedlich! Ich hab immer mal mit Bienenstich geliebäugelt, aber noch nie selbst welchen gebacken. Vielleicht kann ich meinen Liebsten mal mit einem solchen Herz zum Valentine beglücken.
AntwortenLöschenNa dann solltest du das Rezept unbedingt testen ;) Selbstgemachter Bienenstich ist 1000 mal besser als vom Bäcker gekaufter. Besonders weil ich den Hefeteig vom Bäcker nicht besonders mag und es leider nur wenige Bäcker gibt die mit Biskuit Boden backen . Außerdem hat das Herz noch einen anderen kleinen Nebeneffekt gehabt. Denn die Stückchen die beim ausschneiden von der Mandeldecke übrigbleiben eignen sich super zum snacken ( ich könnte mich immer glatt in die Dinger hinein legen :D )
LöschenDie sehen wunderhübsch aus!
AntwortenLöschenDas sieht sehr professionell aus! Viel Glück! Und denk dran im größten Streß: immer tief durchatmen ;-), das entspannt!
AntwortenLöschenHihi Dankeschön ;) Werde dran denken !
LöschenSchaut richtig super aus, da bekommt man gleich Lust auf Bienenstich .
AntwortenLöschenDELICIOUS! Come over and share it with us at Simply BeBetsy under Dessert Sweeties - your blog is wonderful! Glad we found you. Sharon and Denise
AntwortenLöschenHi!
AntwortenLöschenSo glad you joined us and can't wait to see what else you submit! Here's the link to your gallery on Simply BeBetsy! Thanks.
Sharon and Denise
http://bebetsy.com/author/simply-author/Chrissitally's+Cupcakefactory/
I´m really glad you invited me to have a look at your site ! It´s so beautiful ;) And I´m going to share my recipes with you in the future for sure ;)
LöschenLooks delicious! Thank you for linking up at Tasty Tuesdays! Your post has been pinned to my Recipes from Tasty Tuesday board. I can't wait to see what you link up next week!
AntwortenLöschenHave a terrific weekend!
Cathy
APeekIntoMyParadise.com
#TastyTuesdays
Thats really cute looking recipe & yummy too :)
AntwortenLöschenI saw these cookies with a blogger so I came to your amazing blog. overpowering
AntwortenLöschenHi Chrissi
AntwortenLöschenI've seen your amazing cookies a while and planned to make them to our Jewish "Love-Day" (similar to Valentine's Day)
They turned out wonderfully!!
Thank you so much for sharing, and you'll welcome to see mine (of-course I gave you full credit + a link to your post).
My post is in Hebrew, but I include and English version
http://www.winnish.net/2016/08/8931/